Showing posts with label tartlet. Show all posts

Sunday, December 9, 2012

Poached Pears!

A friend of mine introduced me to poached pears a few years ago. I don't know how I had never had them before, but now they are one of my favorite winter treats! Seriously so much goodness from puttin booze in a fruit. Well, you don't have to use alcohol, poaching just means gently cooking in boiling or simmering liquid. But I always have included booze. Because booze.

Here is a great recipe I like for poaching pears in a pomegranate sauce. The cinnamon and clove are perfect flavors for a holiday dessert!

Pomegranate Poached Pears


Ingredients

4 ripe, firm organic Bosc pears
1 & 1/2 cups pomegranate juice
1 cup sweet dessert wine (Muscatel or Riesling). I actually found a pomegranate wine that I use with this recipe and it's baller.
2 cinnamon sticks
1 vanilla bean
1 tablespoon whole cloves
Put everything but the pears in a large pot and get to simmering.

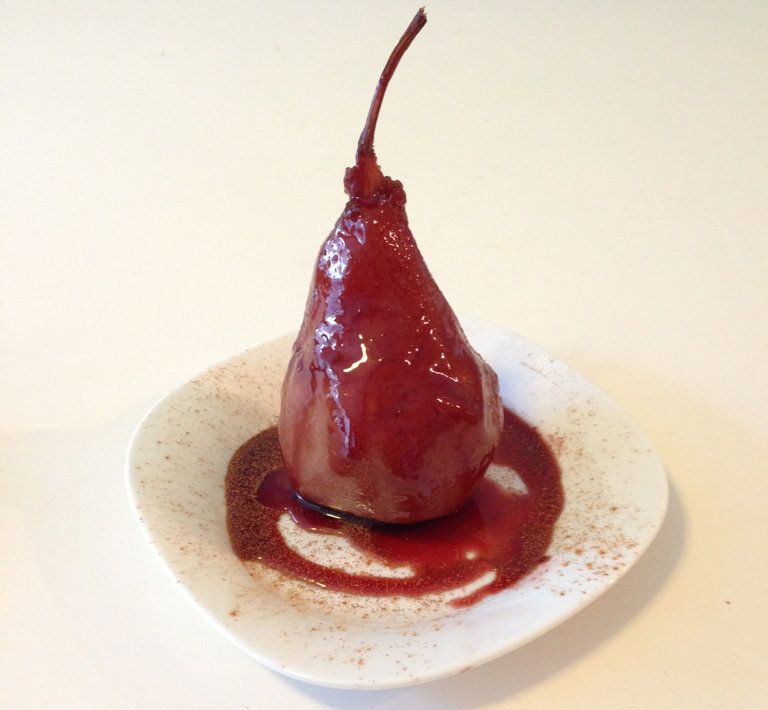
Now you have some options on what you want to do with the pears. Definitely peel them, but after that you can leave them whole, core them, or slice them up. Either way it's going to be yummy, but I like to keep them whole and just core them because presentation-wise it looks real fancy.

Place the pears in the liquid, on their sides, and cover the pot. Cook for about 20 minutes, or until tender. Make sure you turn the pears every little bit, so that the color is consistent all around.

Once the pears are tender, remove them from the liquid. You can then reduce the liquid, if you want to make a syrup to serve with the pears. I like to serve them with a small scoop of mint ice cream. I don't know why the flavors taste so good together to me. But do with them what you will! The pears are delicious and I'm sure you'll dig 'em!


Sunday, December 2, 2012

Christmas Cookie Roundup!

Heading into the holidays, I have been thinking about traditions. When I was little, my mom and I used to have a yearly tradition of baking several types of Christmas cookies and taking plates of them, wrapped in cellophane, to all of our neighbors.


This was one of my favorite parts of the holiday season because I got to help my mom bake what seemed to be thousands of cookies. My favorite to make were the candy cane butter cookies because I got to help roll out the dough into long snakes of red and white. But my favorite to EAT were the chocolate crinkles. So chewy and fudgy, omg so good. Those are still one of my favorite types of cookie, and I'm really getting in the mood to make some. Although, that's highly dangerous as I'm likely to eat the whole batch.

In my Christmas cookie recipe search, I found this Chocolate Crinkle recipe, and it's really great! I've made a couple of batches, and they're soooo good. Plus I added chocolate chips to make them even chocolatey-er.


I haven't carried out this cookie giving tradition in years, but this year I am inspired! Since moving out of my parents' house years ago, I really never have gotten to know my neighbors at any of the other places I've lived. I think that is kind of sad! After years of renting, last year, I finally bought my own home. I think maybe that means getting to know the people who live around me, yes? Even though I've been here for about a year and a half, I really only know ONE of my neighbors, and just barely. Why is it so hard for us to get to know one another? To remedy this, I'm thinking of putting together Christmas cookie plates for my neighbors this year.

I found this great list of Christmas cookies on Pinterest (my not-so-secret love), and these spiral cookies from Sprinkle Bakes look so good! I'm going to have to include them in the mix!
Photo from Sprinkle Bakes

What are some of your favorite Christmas cookies? Did any of you do the neighbor cookie tradition?

Thursday, November 1, 2012

Photo shoot with Danielle Capito and Twigss!

Guys, guys! This is super cool! One of my favorite photographers, Danielle Capito, of Danielle Capito Photography asked if I would like to provide some Tartlet baked goods for a photo shoot with Twigss Floral Studio! HOW RAD IS THAT?!

Of course I jumped at the chance, and worked with Addison at Twigss (she is so super nice) to come up with a menu that fit their theme, haunted library. What an amazing halloween theme! I love it! Twigss put together a beautiful menu chalkboard that listed the items from Tartlet. Their studio is adorable and in the lovely downtown Danville, CA. I highly recommend checking them out for weddings, parties, etc!

I'm so excited to share with you some of the photos from the shoot. Danielle was awesome enough to send some to me. Check out the rest of the shoot at her blog!

Behold, some of the amazing Danielle's photos!

The beautiful menu

Some fig and honey galettes along with plum galettes :)

Plum and blackberry thumbprint cookies with some mini caramel pecan tarts.

German chocolate and salted caramel macarons, with some butterscotch oatmeal crisps.

The lovely models feeding each other Tartlet treats :)

Plum galette!

The full spread.

I'm so super impressed and very grateful to have been involved in this awesome shoot. Addison and Danielle are the nicest ever and very fun to work with. The shoot also got featured on Ruffled!

Thank you ladies for getting Tartlet involved with your photo shoot! 

Friday, October 26, 2012

No More Mint Brussels :( But WAIT!

So this isn't exactly recent news, but Pepperidge Farm, I have a bone to pick with you. You discontinued my favorite cookie of all time! The classic MINT Brussel! They've been gone for a couple of years now, but I'm still upset about it. The crunchy, crispy, minty, chocolaty goodness will never make my mouth happy again. Or will it??


I've been selling my Butterscotch Oatmeal Crisps on Etsy for a while now, they are crispy and light and awesome. BUT the other day, as I was severely missing Mint Brussels, I thought I just might be able to come close to them using a modified version of my Oatmeal Crisps. I fiddled around in the kitchen for a bit, and came up with this...

The mixture when it's all combined before baking

I used a teaspoon to drop small amounts onto parchment paper

After baking for about 7 minutes


Tartlet Mint Brussels

Cookie:
1/2 cup browned salted butter
1/2 cup light corn syrup
2/3 cup muscovado or dark brown sugar
1 cup old-fashioned oats 
1 1/2 cups all-purpose flour
1/2 Madagascar vanilla bean or 1 tsp vanilla bean paste
1 tsp baking powder

Chocolate filling:
1/4 cup heavy cream
1 cup semi-sweet chocolate chips
mint extract to taste

Cookie Directions:
1. Preheat oven to 375
2. Brown the butter. Because everything is better when the butter is browned. Real talk.
3. Add in honey and sugar and get it all melty-like. You want the sugar to be dissolved.
4. Bring the mixture to a boil, then remove from heat.
5. Mix in oats, flour, baking powder, and vanilla
6. Drop small balls of the mixture onto a cookie sheet, about a teaspoon worth. They will spread so don't put them too close together.
7. Bake for about 6 - 8 minutes or until cookies begin to brown
8. Let cookies cool completely before you add the filling and sandwich them.

Filling Directions:
Heat cream until simmering, then pour over chocolate chips and stir until it all melts together. Add in drops of the extract until it's as minty as you want it to be. It doesn't take much, so be careful! Then put some in the middle of two cookies and you're done! TASTY!

They aren't exactly the same, but they are close enough to make me extremely happy. And I'll probably continue to tinker with the recipe, but I'm on the track. I love you Mint Brussels, welcome back to my life.


Thursday, October 11, 2012

New Things! New Things!

Hello all! I apologize for my posts tapering down again, but there's been lots going on! A) I've had a lot of orders lately, which is AWESOME! Thank you to everyone who has been ordering from my Etsy Shop, and I hope you've enjoyed your treats! B) My day job has been quite overwhelming and frenetic of late. And finally C) I've been working on some NEW things for a very special order, which I will hopefully be writing more about soon. Intrigue!

I just wanted to talk about a couple of the new things that I've made lately, and about some things that will hopefully be available soon in my shop. SO! Obviously the name of the bakery insinuates that there might be some small tarts for sale... I have definitely failed on that front so far. But, do not worry, my little muffin heads! I have been working on some tartlet-ey things lately and have (I feel) perfected a recipe for Turtle Tarts! Behold!

Not only are they SOOOOO GOOOOOD, they are so pretty! I have to say, I am particularly proud of this photo too. I am not the best photographer, as I'm sure you all have noticed, but I think this picture is really pretty and tasty looking. BIG SMILE! Hopefully I will add these, as well as some other tartlet type items to my shop in the near future. Huzzah!

I also have been working with some Autumn produce for this special order, and came up with some really beautiful plum galettes and fig & honey galettes. Check out this picture of the fig & honey!

I would like to put some more galettes up in my Etsy Shop, but I'm having a bit of trouble figuring out appropriate packing/shipping methods for those. So for now, they will only be for local special orders. 

Anyhoo, those are a small tidbit of the things I've been working on in the Tartlet kitchen! I hope to share more with you soon!


Monday, October 1, 2012

Bacon Shortbread!

As you may have seen, I've had Whole Wheat Shortbread up in my Etsy shop for a bit now. It's really good, but I've been trying to think of what I can do to spice it up a little. Give it a little twist. Since everyone is nuts about bacon (including me), I thought I might try adding it to my shortbread! I've always wanted to try incorporating bacon into a baked good. Who doesn't love that salty/sweet combo? I'm a huge sucker for it.


I used my regular recipe for the Whole Wheat Shortbread (using King Arthur White Whole Wheat, it's truly awesome). I then made a good amount of bacon in the oven, to get it nice and crispy. Crumbling bacon is a seriously difficult task. Not because it doesn't crumble easily, but because you want to eat all of the bacon! My kitchen was so full of bacon smell, it took the will power of a thousand will powers, not to gobble it all up (I may have set aside a couple of pieces for eating, shhh...). So after I crumbled it all up, I tossed it with a bit of brown sugar, then sprinkled the mixture over the pan of uncooked shortbread, and baked it like normal.


My house smelled sooooo good! Bacon smell? Plus. Baking shortbread smell? Double plus. Of course shortbread takes forever to bake AND then I had to wait for it to cool before I could try it. But it was worth the wait! Super delicious! Sweet and salty and cookie-ey and bacon-ey! Why did I wait so long to try bakin with bacon?!


Want to try some? Bacon Shortbread is now up for sale on my Etsy Page!

Happy Monday everyone!

Monday, September 24, 2012

Fall Flavor Macarons! (With a recipe for Italian Meringue)

I LOVE Autumn. It is my favorite season, with Winter being a close second. There's just something about cold weather that makes me feel so snuggly and happy. I love everything about it, the colors, the fashion, the food, the hot drinks. And Halloween! Nothing gets me in the mood for fall like the movie Hocus Pocus! So this weekend I got into the fall spirit and put together a couple of new macaron flavors to celebrate the season!


Pumpkin Spice and Apple Spice! I know everyone goes ga-ga over pumpkin when September rolls around (thank you for the Pumpkin Spice latte, Starbucks), but I don't want to forget the amazing apple! I love apples, apple cider, and APPLE BUTTER! Delicious! These flavors of macarons are now available for purchase in my Etsy Shop!

When coming up for the fillings for my various macarons, I often use Italian Meringue (sometimes called Italian Buttercream, but there is no butter in this recipe). For both of these new flavors, I mixed in Italian meringue to give it texture and sweetness.

I find that this recipe is fairly simple, and makes a cream/meringue that you will not be able to stop sampling. I think I went through at least five spoons in the process of making my last batch because I couldn't stop taking taster bites.

Ingredients
8 oz sugar
2 oz water
4 oz egg whites

Directions
Heat the sugar and water mixture, make sure you brush the pan with water to make sure there are no dry sugar crystals. When the syrup reaches 220, start beating your egg whites. Once the syrup reaches 240, your egg whites should be at stiff peak stage. CAREFULLY pour the syrup into the egg whites, as they are still beating. I can not stress enough how careful you need to be with this syrup. It is lava! Pour all of the syrup in and keep beating until the mixing bowl reaches room temperature. I'd guess this takes about eight minutes, but I'm terrible at time estimation (I know, terrible affliction for a baker, but that's why I use my trusty phone timer when things are in the oven), so just mix until the bowl is room temp and you're good.

The finished product is going to be thick and glossy and delicious and amazing and addicting. And and and. You can use it to frost a cake, make meringue cookies, top a pie, or make macaron fillings!
Image from Classy Catering Creations because I fail at remembering to take pictures

If your meringue starts to separate after a couple of days, just throw it back into the mixing bowl and mix it until it becomes fluffy again. All good!

Happy Autumn, everyone!

Tuesday, September 11, 2012

Out of the Kitchen Tuesday #1

As I mentioned the other day, I've been feeling particularly crafty.

Sidebar: Whenever I say "crafty" I think of the Beastie Boys song. "She's crafty! And she's just my type!" (RIP MCA).

Anyhoodle, back to my post!

I'm going to try to post something crafty every Tuesday... we'll see how it goes!

So, my downstairs guest bathroom has been pretty blah since I moved in over a year ago. (Jeez, get on it, Aubrey.) I have a hard time deciding on color schemes and decorations and stuff like that. Recently I had a good friend of mine, Haya from The Calculated Kitchen, come stay with me for a few days (which was so much fun). There's nothing to inspire home improvement projects like knowing you will soon have a house guest.

One of the ideas I wanted to actually do, was make a sign for above the toilet that says "Have a Seat". Silly, I know, but I thought it was cute. I had gotten some little canvases on sale at Michaels, and thought I should put one of them to use.

I started with my blank canvas and some pretty paper (also from Michaels).

I then covered my canvas with the chosen paper.

Then traced my lettering onto the paper...

Then I got to painting! I'm sort of a turquoise fiend, so the colors I ended up on for my bathroom are turquoise and orange. I thought the turquoise paint looked good on the paper I chose. 

The only problem was, the letters weren't thick enough to really stand out against that busy background, so I did have to outline them all in heavy black ink. 

Once the lettering was all done, I added a small paper flower to the corner and woo! Finished product! It's now hanging in my bathroom, looking pretty, and the paper flower matches the flowers I made for the vase next to the sink. Excellent. 


I'm thinking of doing another couple of these and adding them to my Etsy shop. Would anyone be interested in something like this? I think it's cute, but I could just be a whackadoodle...

Thursday, September 6, 2012

Salted Caramels - ooOOOOOoooh!

First off, let me start by saying I've never been a huge caramel fan. It's usually over-the-top sweet for me and hurts my teeth. Yet everyone calls me crazy for not liking it. I want to like it, I really do. It LOOKS really great. Especially when people put salt on it. I'm a huge sucker for the salty/sweet combo. So when I ran across this recipe at Flour it Devour it, I thought it might be time for me to attempt caramels. I like that the recipe does not use corn syrup, but rather honey. I LOVE love honey, and thought the flavor would really lend itself to caramel. Also, there's vanilla. Double yum. So I went about trying out this recipe, with just very slight modifications.


Thank you instagram for making my crappy photography look any kind of acceptable. Hopefully.

Salted Caramels

1 &1/2 cups vanilla sugar
1/2 cup raw honey
1/2 vanilla bean
1/2 cup salted butter, chopped into small cubes
1 cup heavy cream
Sea salt for sprinkling

So I started with raw honey and organic cane sugar. I used vanilla sugar that I made (it's easy, just chop up some vanilla bean, scrape it into the sugar, then throw it all into an air-tight canister, scraped out beans included, and the flavor infuses into the sugar. SUPER good). Pour the honey over the sugar and let it melt on a medium to low-ish heat. I also scraped an extra half of a vanilla bean into the mix, because hey, I love vanilla. Do not stir the sugar! Stirring may cause it to crystallize. If you need to do something because you just can't stand it, swirl around the pan a little, but please refrain from stirring. I know it's difficult.


While the sugar is melting in the honey, heat up the cream, bringing it to a simmer.

When the sugar is melted, and it's a beautiful golden brown color, add in the pieces of butter and whisk until it's all melted in and smooth. 


Once the mixture is smooth, slowly add in the heated cream and whisk together. The mixture will foam up a lot, so be careful. Let the mixture cook until it reaches 248°F. 


When the caramel reaches 248°F, pour it into a pan that has been lined with parchment paper. I used a 13x9 quarter sheet pan. Once it's cooled a bit (10-15 minutes), sprinkle the sea salt over the pan. 


After the caramel has cooled to stiffness, cut it into whatever size or shapes you like. I cut mine into pieces about an inch and a half long, and half an inch wide, then wrapped them in parchment paper. Viola! Delicious, creamy caramels with tones of honey and vanilla and a hint of salt. YUM!

Tuesday, September 4, 2012

Tartlet: Out of the Kitchen

Lately I have been in a super crafty mood. Like, super crafty. Crafts and I have had an interesting relationship throughout my life. Growing up, my mom was (and actually still is) the queen of arts and crafts. THE QUEEN. Which was pretty awesome as a kid. There were always fun projects to do and mom would jump at the chance to do something artsy with us.

In my college years, I began to have a resentment towards crafts and craft mess. I started feeling overwhelmed by the disorganized nature of crafting and all the bits and pieces that went along with it. It probably doesn't have to be that way, but in our house it was. Art materials basically exploded all over my parents house when I was little, and has stayed that way to this day. Because I had no idea how to organize stuff like that, I began to just avoid it. 

UNTIL NOW! I am not sure what's happened, but the crafting bug has bitten me once again and I find myself wanting to buy yarn, fun paper, paints, and all those wonky edge scissors. I kind of blame Pinterest.

In any case, this brings me to my point. I'd like to perhaps add a section of my shop called Tartlet: Out of the Kitchen, in which I sell items for the home, beauty, paper things, etc. Just stuff, that isn't edible. What do you think? Is this me not being focused? Am I too ADHD to stick to one business idea and go with it? I guess we'll find out!

Here are some of the things that have inspired me lately...

Adorable pin cushion. SERIOUS ADORABLE! 

Cute little drawstring bags.

Hand lotion bars.

And more!! I also kind of want to do a line of one-off, hand drawn greeting cards. I have already done a couple, but don't want to put them up until I have some more done.

TOO MANY IDEAS!

I've also been fooling around in the Tartlet kitchen and have come up with some more goodness, including salted caramels, and chocolate bark. I will be putting these items up soon!

Hopefully you will see a whole bunch of new stuff in my shop, as I branch out into other areas, outside of baking. And if not, well, there goes my ADHD again :)

Friday, August 3, 2012

Tartlet is BACK!

As you hopefully know from following Tartlet on Facebook, I closed down my shop for the month of July. My boyfriend and I took a pretty long roadtrip/camping vacation the first couple of weeks of July, and when we got back I needed to focus on some house projects. But I have returned! Yay!

Allow me to bore you with vacation pictures for a moment :)

A beautiful lake in Nemo, South Dakota

Gorgeous view from Needles Highway in the Black Hills National Forest

Man and dog being scoundrels in Four Mile, South Dakota

Devils Tower, Wyoming

Shell Falls in Big Horn, Wyoming

I have many more, but I won't get too carried away. We had an amazing time, and I was also able to meet most of Kris's family (they live in Wyoming), which was great. 

BUT NOW I'M BACK! And baking with a vengeance. I have a couple of new items that I plan to put up in the Etsy shop in the next couple of weeks, so keep an eye out!!

Small update on working with Cafe Pascal: we are no longer working together because we had some differences of opinion on some issues. The main issue being he didn't want to pay me for my baked goods. Oh well... 

Friday, June 15, 2012

HUGE NEWS!

Tartlet Bakery will now be selling items at Cafe Pascal near the Richmond Marina! HOW EXCITING!!! This cafe is soooo cute and sells really yummy french inspired food and desserts. The owner, Joe, is awesomely nice and encouraging. He said that I could sell my things there and can even use his kitchen! So, starting on Monday, I will be going there super early in the morning to bake fresh goodies three times a week! YAAAYY!


This is such a step forward for me! If I can keep up this progress, I'm on track to being able to do this full-time!


Also, check out these amazing photos of Tartlet macarons, taken by Randy Aquilizan! He's so talented! I want to eat them off of the screen!


Honey Lavender

Vanilla Lemon

Mint Chocolate

Pretty!


Wednesday, June 13, 2012

Galette Success!

As mentioned in my last blog, I wanted try making some little blueberry free-form pastries called "galettes". I finally made some and they turned out great! I have a feeling that I'm going to be making these a lot before the blueberry season is over... but you know what's right around the corner in my parts? Blackberry season! Blackberry galettes sound like a fine idea as well, don't they?

I ended up using the crust recipe from Spoon Fork Bacon and it was awesome!

Ingredients:
1 cup all purpose flour, plus more for dusting
¼ teaspoon baking powder
1/8 teaspoon salt
6 tablespoons cold unsalted butter, cut into small cubes
4 ounces cold cream cheese, cut into small cubes
1 tablespoon cold water
1 tablespoon apple cider vinegar

Directions:
1. Sift together the flour, baking powder and salt.
2. Place butter and cream cheese into the bowl with the flour mixture and cut together until fully incorporated. The mixture should be evenly grainy.
3. Add water and vinegar and knead together until the mixture comes together and a smooth dough forms, about 2 minutes.
4. Pat the dough into a disc, cover with plastic wrap and chill in the refrigerator for about 30 minutes.

For the filling, I stayed really simple because I just wanted the natural flavor of the fresh blueberries to shine.

Ingredients:
8 oz fresh organic blueberries
1 tbsp lemon juice
1 tbsp organic cane sugar
2 tbsp raw honey
2 tsp corn starch


I rolled out the dough to about 1/4 inch thick and cut out circles with a cup. The diameter of the circles was probably about 3 inches. I put as much filling as made sense for the dough. I'm not exactly sure how much it was. A couple of spoonfuls maybe.


Then baked at 400 for about 10 minutes! YUM!  They turned out super delicious! I brought a few to work for people to try and the feedback was all very positive. 

These mini galettes are now available to order in my Etsy Shop. Enjoy!